I have titled it A Cats Path of Destruction, as the entire tablecloth depicts various acts of pet destruction, followed by incriminating paw prints.
I also added paw prints to the original tablecloth to tie the two tables together.
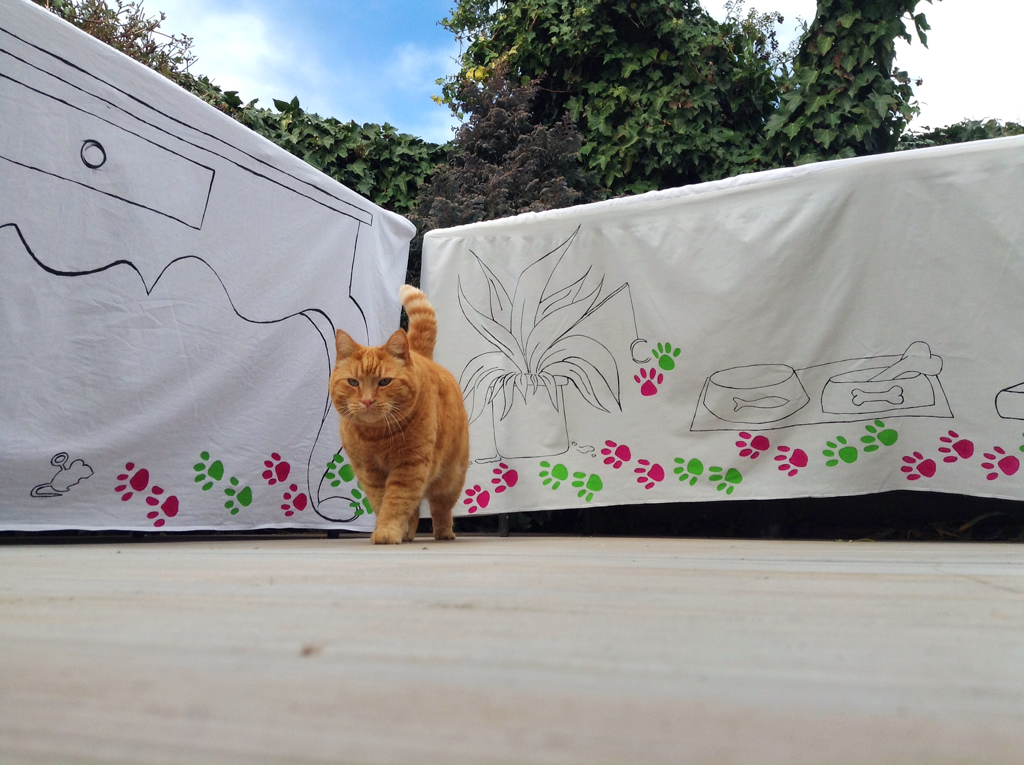
A few posts back I wrote about a tablecloth I made for a table I take to markets. I made a wraparound tablecloth with an antique-style table painted on it. Well, I've added a second table to my market set up. I sell pet products and I wanted to bring pets into the design of the new table. Unlike the first tablecloth, which sits at the back of the market set up, this table will sit on the corner and will be viewed from all angles. The tablecloth wraps entirely around the table, it ended up being a long stretch of fabric, 70cm wide by 5.5m long. I have titled it A Cats Path of Destruction, as the entire tablecloth depicts various acts of pet destruction, followed by incriminating paw prints. The what-I-call-front of the tablecloth shows kitty-cat paw prints, knocking over a stack of books, completely ignoring their food, and pausing to play with a toy stuck in a potted plant, before wandering off round the corner. 
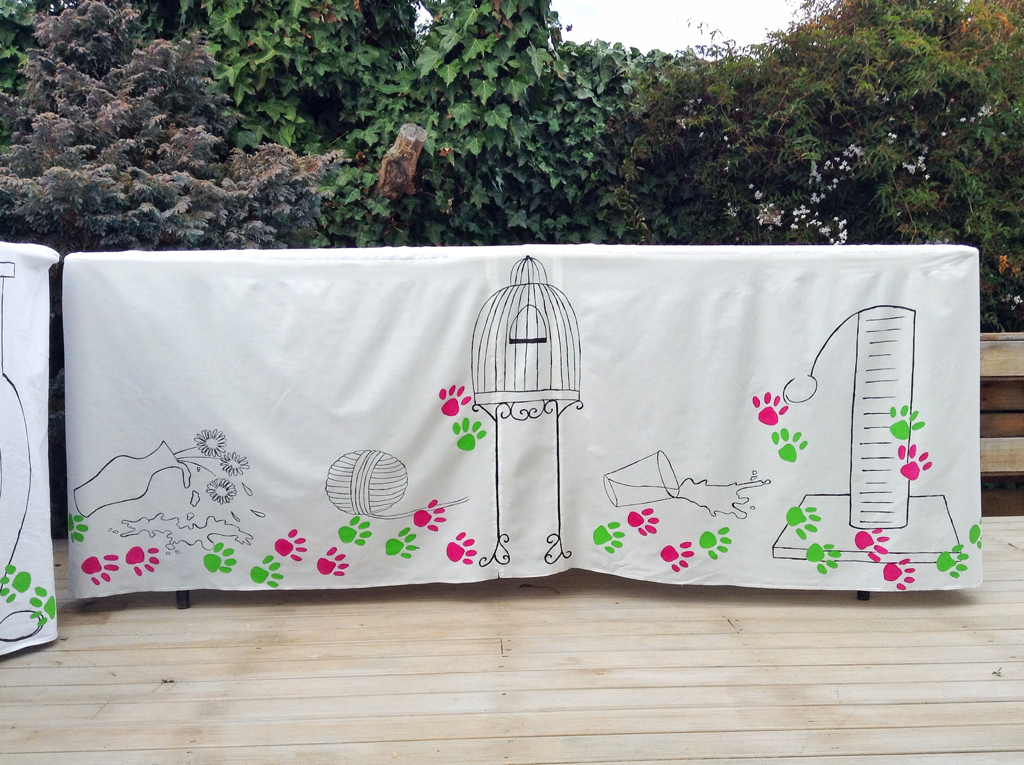
The other side starts off with a tipped over vase, spilling water and petals, a ball of wool, an old bird cage, with sneaky paw prints, a knocked over glass, and a cat scratcher, that has actually been used! 
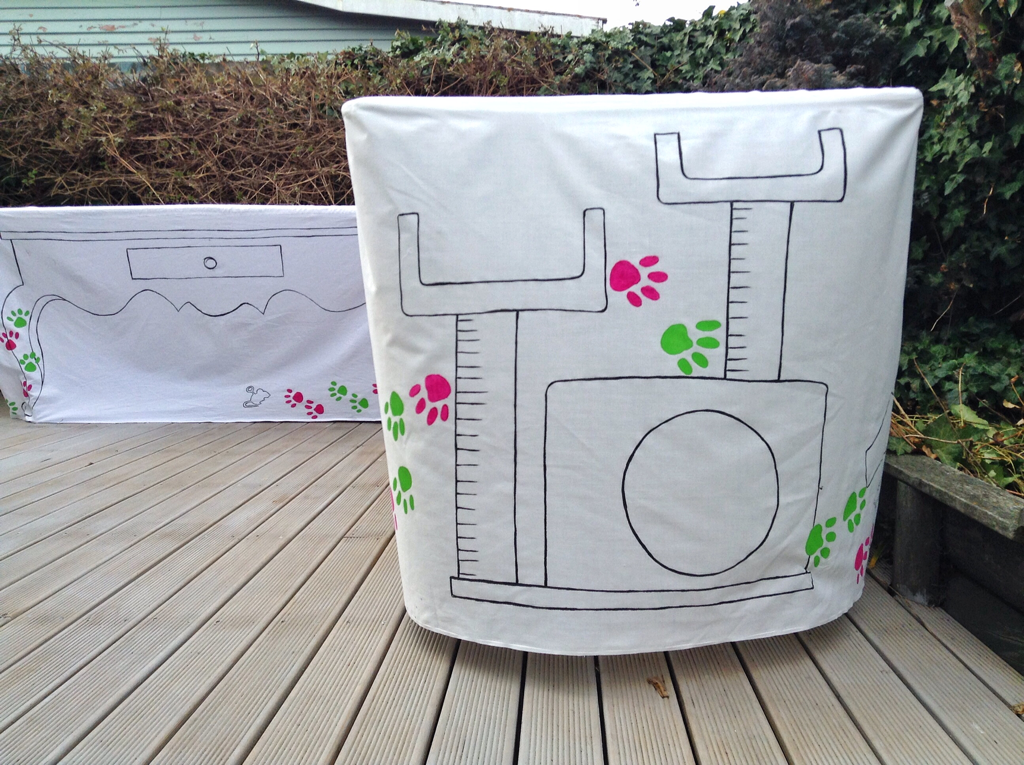
One end has a multi level cat house. 
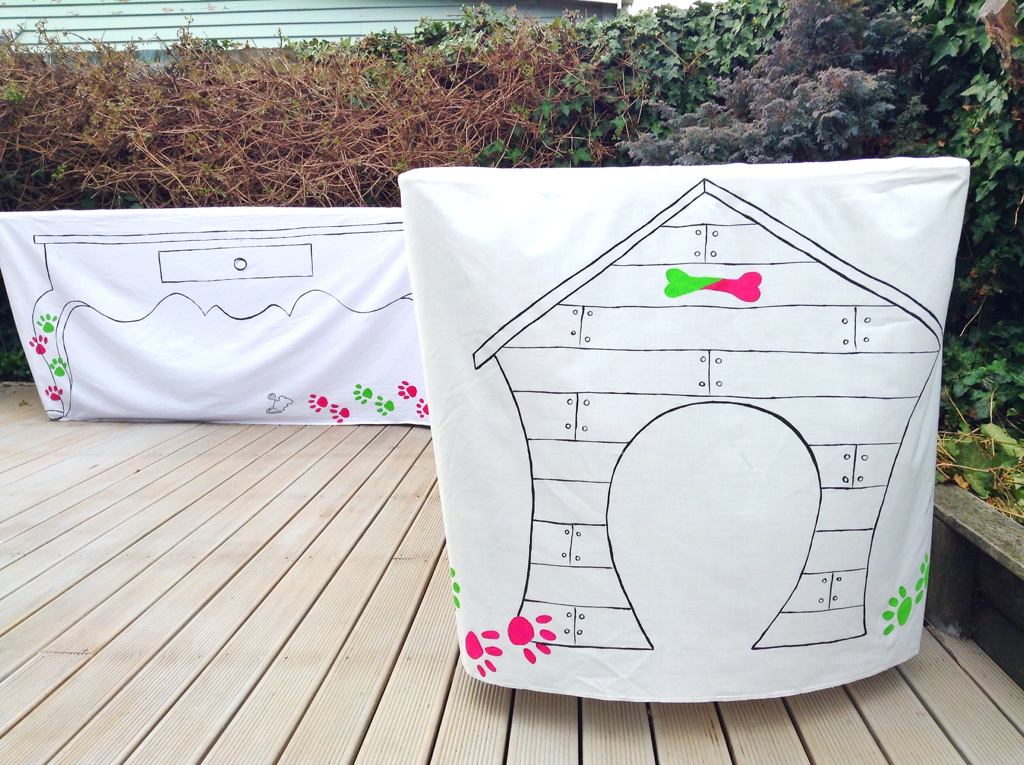
While the other end has a wonky kennel. 
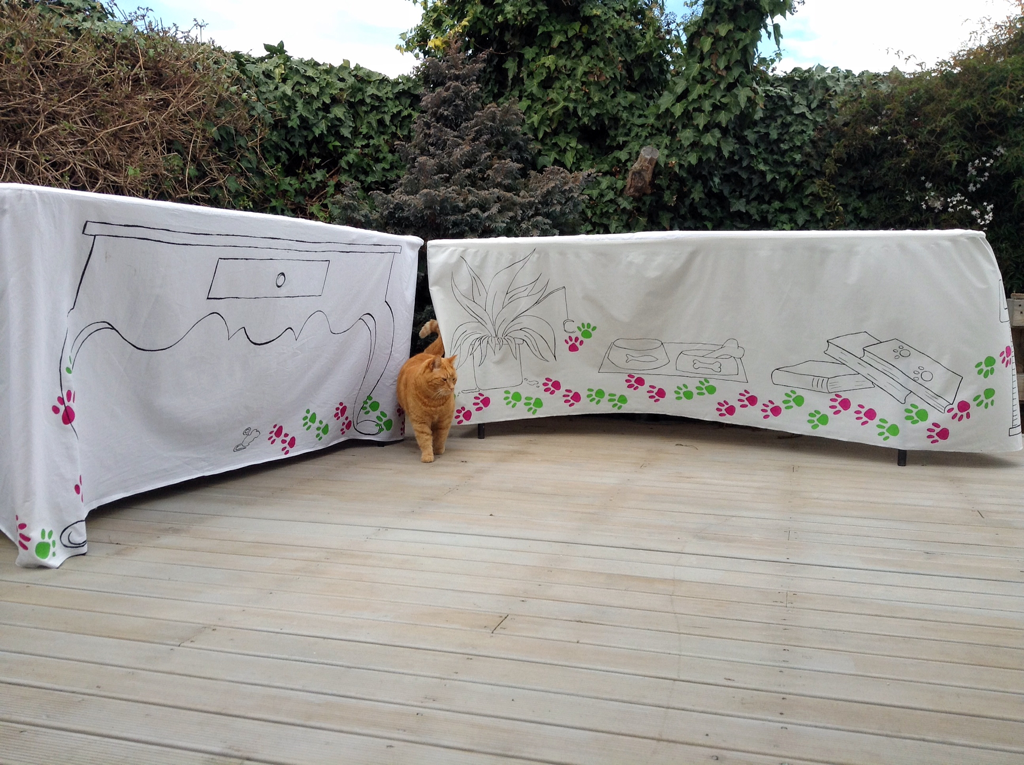
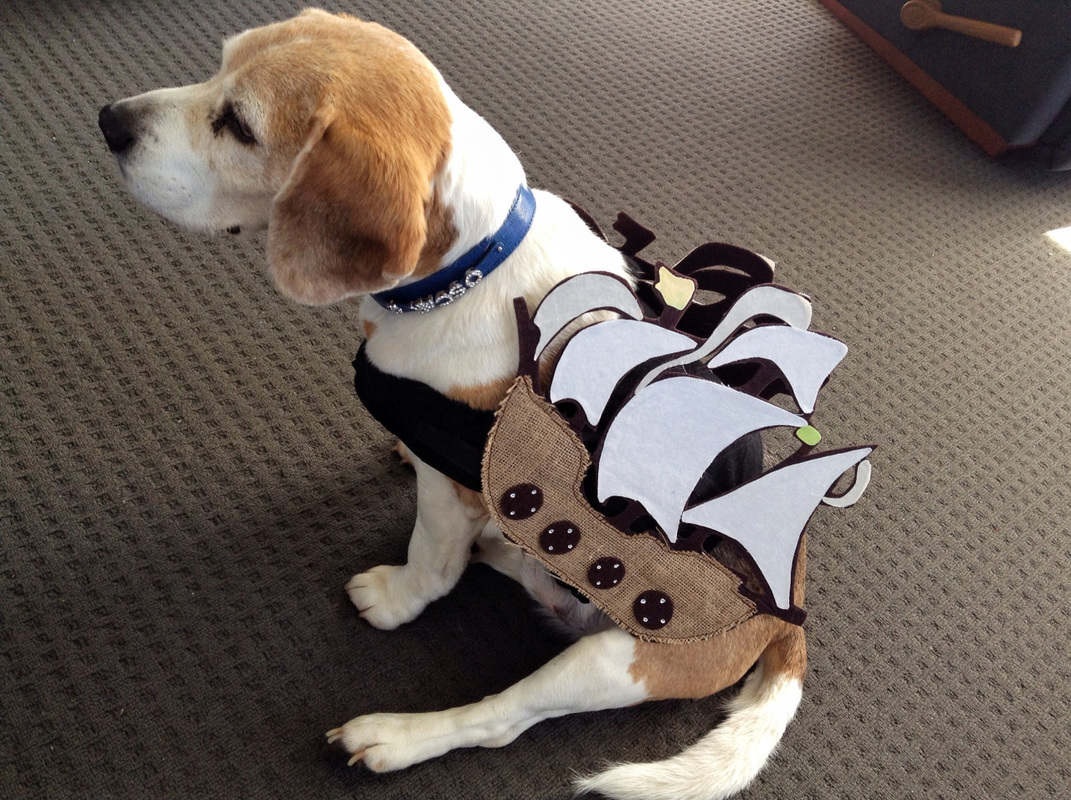
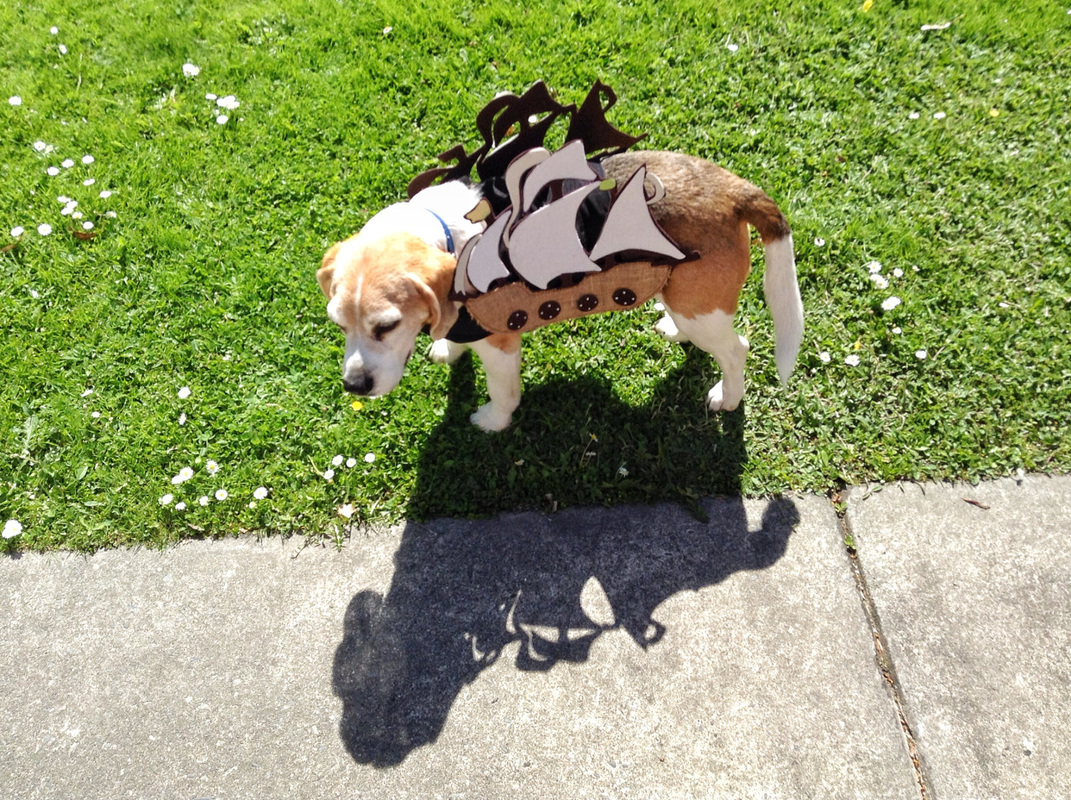
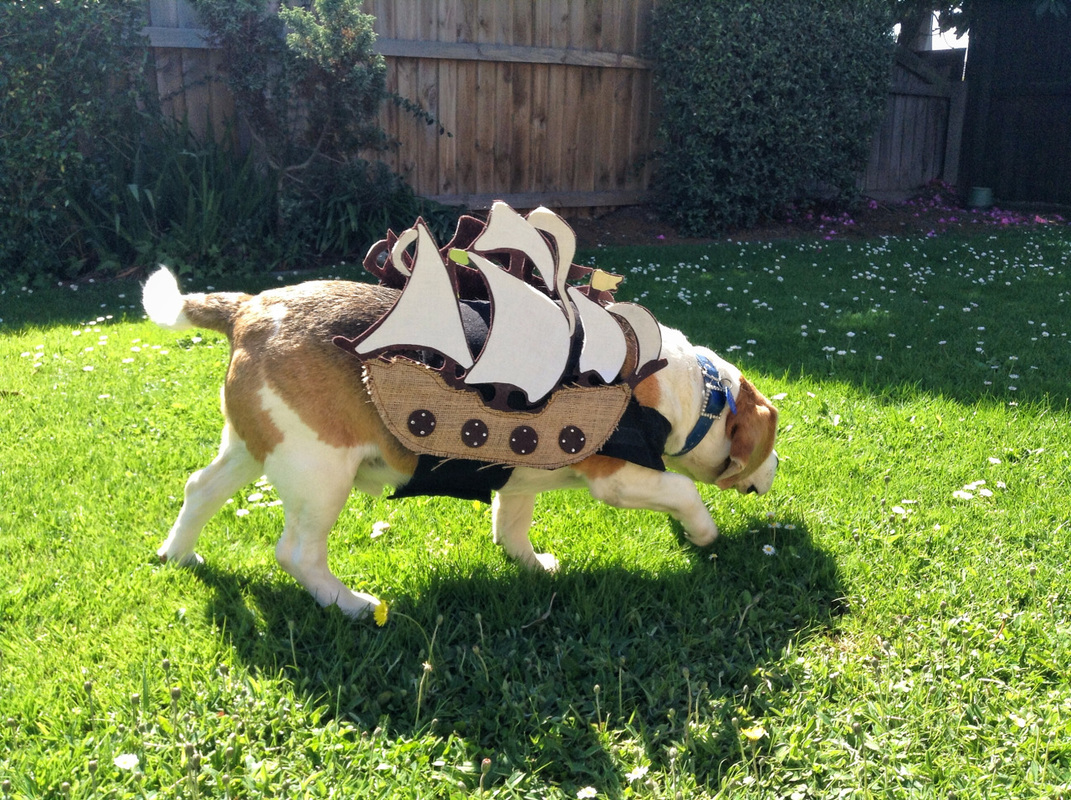
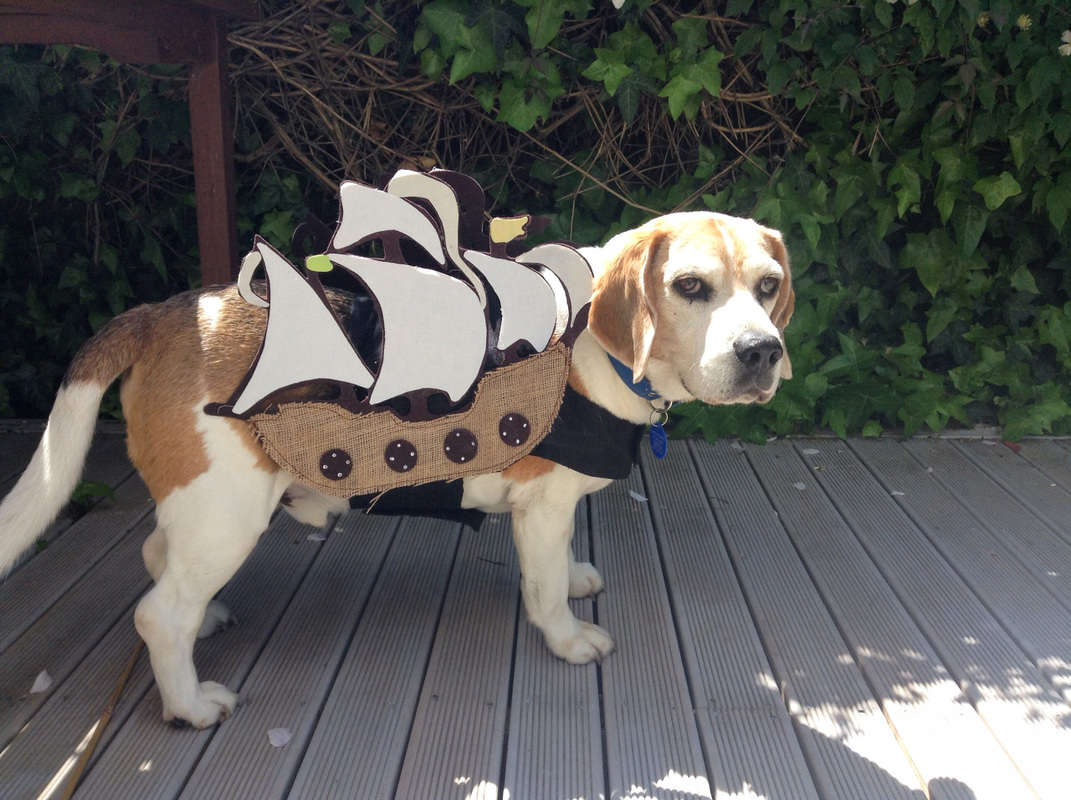
Figwit stepped in at the right time to "complete" the photo. I hope this tablecloth works. It's purpose was to attract the eye and tell a story, that is hopefully relatable to pet owners.
I also added paw prints to the original tablecloth to tie the two tables together.
0 Comments
Oscar, my Beagle, is dressing up as the HMS Beagle for Halloween this year. Osacr's job is to greet trick or treaters at the door but he's lazy in his job and generally sleeps whenever he has a spare second. Because of this his big boat costume had to be able to adapt into a napping costume. I wanted a costume that was easy to get on/off, something he could sit or lie down in, and something that wasn't too precious and prone to damage. I ended up making a costume out of felt. I used: - Felt (two large A3 sheets) - Burlp - Cotton - Fabric glue - Velcro Fisrt I made a quick fabric harness the same shape as these, minus the D-ring attachment and fleece (its spring here, too hot for fleece). I sewed two lines of velcro on each side of the harness, so that the boats can be added/removed at leisure. It also means that I can reuse the harness for other costumes. I found a cool boat/ship outline I liked and modified it so all the sails conected together in one solid image. I cut out two ships. One for port side and one for starboard side. I sewed two lines of velcro to each felt boat (on opposing sides) Next I cut out cotton sails and a burlap hull. I glued all pieces down with fabric glue. I also sewed around the edge of the burlap hull, just to prevent excessive fraying. Lastly, I cut out some round ships windows and glued them down with fabric glue. HMS Beagle ready to find the origin of species with his mate Charles. Here he is! He decided to pose for his fitting. A bunch more photos because this HMS Beagle is cute!
Break out the whiskey! Beware the Jackalope! Hark the Harpy! Slay a Dragon or Two! I just hope you have your Unicorn Hunting License handy Trophies for the mystical monster hunter. This is how I imagine the home of Van Helsing. Small Halloween monster plaques adorn the walls of a spooky Halloween-esque mansion. Made out of clay, these plaques can be used in miniature halloween displays, or worn on a necklace. Hunt Down. . .- Polymer clay - Card - Acrylic paint Magicing . . .I started by sketching out some plaques of different shapes and sizes. I rolled out a thin layer of polymer clay and cut out two plaques. The idea was to sandwich the card between the two layers of clay. I had hoped this would keep the plaques flat and prevent the edges from curling. It didn't work quite as expected. Cutting out a single thicker layer would probably work better. I rolled a thin layer of clay to run along the edge of each plaque. Then I baked all the plaques in the oven before adding the monsters. I have done a quick DIY for each monster below. UnicornThe unicorn. A mystical, and most elusive, woodland creature. This is probably th easiest of the monster heads to complete. JackalopeBeware the Jackalpe! For it shall tear 'yer leg off! And break out the whiskey! The Horned Hare; A wonderful woodland combination of deer and rabbit, with a heck of a lot of spirit. (I had a pet rabbit with spirit and fully believe all claims that bunnies and their kind are fearsome beasts) DragonYou know what they say, two heads are better than one. These two lizard bros are inspired by the two headed dragon in How to Train Your Dragon, or in this case How to Capture Your Dragon. HarpyHuman-bird hybrids this snatcher was snatched before she could snatch. I can definatley see Van Helsing hunting down a harpy for his wall. Once the heads have been sculpted, bake the plaques again, then paint to your hearts desire. Varnishing the pieces will protect the paint. Happy Halloween !!!!!!!
DIY Batty Bat Cookie Cutters"It was her first sabbat, and she was determined to do it right. 'Would anyone care for a scone?' She said. Bat cookies with current eyes, inspired by Magrats bat scones. I know in the book Magrat makes scones, but I always pictured bat cookies with currents eyes. Strangely, I think that was the thing that first made me want to bake. Wyrd sisters was a staple of my childhood. I knew that story backwards before I could even talk. The bats with currents for eyes have stayed with me all my life. It's funny what sticks in the brain. Luckily bats, currents, witches, covens, and, indeed, ovens go well with Halloween. This tutorial looks at making your own bat shaped cookie cutter not baking your own cookies. You will need🕸 Tinfoil 🕸 Stapler and or tape Start with a sheet of tinfoil about 60-70cm long. Fold tinfoil in half lengthwise four times until you end up with a strip of tinfoil that's about 2cm wide. Fold length of tinfoil in half widthways. Fold in half lengthways (last time) Shape tinfoil. Use a wooden spoon to shape curved areas. Staple together the ends. (My stapler broke so I've taped the ends) I made chocolate bownie cookies from here, only I added a little nutmeg and cinnamon to make the cookies a little more festive. Bat cookies with current eyes, cooling on the rack. They look a little crude but that's okay, I figure Magrat is an enthusiastic but crude cook. - A note on the post title. It's a reference to the opening of Wyrd Sisters when Magrat asks Nanny Ogg and Granny Weatherwax to join a coven. Witches don't always have the best hearing. "It'd been her idea to form a local coven. She felt it was more, well, occult. To her amazement the other two had agreed or, at least, hadn't disagreed much. I liked it. The bats join an oven in order to be served to a coven.
I think these cookies also work well as Bat Bogey Hex Cookies. Ah yes, crappy Halloween drawings. I can't possibly complete every craft idea I have, so I draw little crappy sketches of ideas instead, and at Halloween time I share. Last year Blue Girl tried out costumes for Halloween, this year Blue Dog and his friends try out some very fetching ideas. And, Yeah, I like puns :) What will I, theoretically. dress next year?
Magnetic Holders Turn old toys into photo and note holders. You Will Need:
MethodTake a plastic animal figure and mark the middle in pencil. Clamp figure onto a piece of wood (something you don't mind cutting into) And cut the figure in half. Sand the figure to remove any plactic shavings. Glue each half of the figure to a magnet using strong glue. Use animal magnets to display photos and hold notes. Use two small figures to hold up a large photo. They also make excellent fridge magnets.
I went completely themed for this birthday. I had the mouse hooded blanket, soft toy mouse, paper mouse puppets for the card, and I mouse-ified (it's a word now) a gift bag. You Will Need
Craft . . .Cut seven rings from the cardboard tube. Arrange the rings into a mouse shape. Fold and manipulate some of the rings to make feet and a tail. Glue all of the rings together. It is helpful to use pegs to get all the rings to glue together. Paint the rings to make the mouse stand out. Glue mouse to the bag. Place a sheet of paper in between the bag just to make sure the glue doesn't soak through the paper and stick the bag shut. Add a bow or a flower.
Following along the mouse/Beatrix Potter theme. Instead of making a card to along with the Beatrix Potter inspired hooded blanket present, I made a couple of mouse finger puppets. I pegged the puppets, using little wooden pegs, to a small card. I figured a one year old would appreciate interactive puppets over a card. PatternPuppeting . . .Trace pattern onto card and cut out. Add glue. Glue the head into a cone shape, and the body into a ring. Once these edges are dry glue a second ring inside the cone. Use pegs to hold everything in place while the glue sets. Fold ears and tail forward. I also dip the nose in white acrylic paint. (the non-toxic kid friendly stuff) Snuggled down in the blanket waiting to be discovered.
Toy MouseMr Tattlemouse; A companion to my Beatrix Potter inspired Hooded Blanket based on The Tale of Mrs Tittlemouse. This mouse was kind of a throw-together piece. Made from leftover fabric. I didn't take any progress photos so treat this as a little add-on tutorial to the Hooded Blanket. I do have patterns, though! Which is the main point of this post. You Will Need:
PatternThese patterns were sketched and scanned from A4 paper, so they should be the right size if you print them A4. Sewing1) Trace and sew two ears onto doubled fabric. Cut out and turn through. 2) Cut out two body pieces, adding a 1cm seem allowance. 3) Cut a slit for the ears and sew ears into place. 4) Embroider the eyes onto the body pieces. 5) Place body pieces good sides together and sew, leave a small opening at the bottom. 6) Turn body right side out. Thread three thick embroidery threads through the seem at the back of the body. Knot threads on inside of body. Plait threads to make tail. 7) Stuff body and sew up the opening. 8) Using a few hand stitches tack the ears into a pleasing position. BowI wanted a big fancy Beatrix Potter-esque bow. Something grand. 1) Cut out bow on doubled fabric (good sides together) leaving a small opening at the bottom. Turn through. 2) Using hand stitches gather the center of the bow. 3) Wrap fabric around the middle of the bow to cover the gathering stitches. 4) On doubled fabric trace and sew two bow tails. Cut out and turn through. 5) Sew or glue the two tails to the mouse. Add the bow on top. He's a good companion for story and bedtime, listening to all the stories of naughty bunnies, tidy mice, silly ducks and rascally squirrels.
Mouse Hooded Blanket"Once upon a time there was a woodmouse, and her name was Mrs Tittlemouse." I have a Beatrix Potter themed DIY today. I have been invited to a one year olds birthday party! I think its the first infants party I've been to (since I was a child, of course) After some deliberation, and internet searching, I decided to go with a Beatrix Potter theme, you're never too young for artfully drawn woodland creatures. I made a hooded blanket. It's something cuddly, versitile, and useable, with no small parts. And unlike clothing you don't need to worry so much about geting the size right. Peter Rabbit is probably the most obvious Beatrix Potter story to go with but in the end I decided to go with The Tale of Mrs Tittlemouse, just because I felt a mouse face might translate better to a hood than a bunny face. In the end it all came down to the ears, mouse ears will just sit better. I teamed the cuddlesome hooded blanket with the book The Tale of Mrs Tittlemouse, and a toy mouse which i made out of the scraps. You Will Need:
PatternI traced out the pattern pieces, which you can see in the pictures below. Each picture should be sized and printed on A4 paper. CuttingHood Main soft cuddly fabric - cut one hood front and one hood back piece. lining fabric - cut one hood front and one hood back piece. Face - Cut out two felt eyes, and one felt nose. Ears - Cut out two ears in the main soft cuddly fabric, amd two ears in the contrasting ear fabric. Beacuse the ears are small they can be hard to sew so instead of cutting out the ear shape I cut a square of fabric around the ears, sew, then cut around the ears. - you can see this in the picture above. The blanket - Cut out 2 rectangles about 90 X 80 cm.* * The blanket piece is double sided. I cut out two pieces of the cuddly fabric because its so soft and snuggly but you could also line the blnket in a different fabric if you want to. SewingPin and tack the felt nose and eyes onto the front hood piece. Placement for the face can be found on the front hood pattern. *Tip: The fabric I was using frayed easily and lost lots of fluff the minute it was cut, before I did anything I overlocked every cut edge. If you don't have an overlocker Zig-zag the edges before you start. Satin stitch around the outside of the eyes and nose. Remove tacking stitches. *Tip: Place a piece of tear away interfacing/fusible web, or even a piece of calico behind the eyes and nose before satin stitching, this should help to prevent the fabric from bunching. Cut/tear away excess backing after you've finished stitching. Adding whiskers. On the wrong side of the fabric draw out lines of whiskers. Using these lines as a template sew whiskers onto the front hood. Sew over each line 2-3 times so the whiskers stand out. Add a twitchy little button nose. In the lining fabric cut out a small circle about 4-5cm. Hand stitch around the edge of the circle and pull tight to gather the circle into a ball. Stuff with stuffing and sew onto the face over the whiskers. Trace a right ear and a left ear onto the wrong side of the contrasting ear fabric. Pin contrasting fabric to soft cuddly fabric (good sides together) and sew each ear. Cut around each ear and turn through. Top stitch each ear. Pin and tack ears onto front hood piece. Placement for ears is drafted on the pattern. The contrasting fabric should be facing the good side of the hood front. Pin hood front and hood back pieces together and sew. Turn through. Do the same for the hood lining pieces. Pin and sew hood front to hood back (good sides together) Cut notches into the seem allowance to reduce bulk. Leave hood lining inside out and place over the outer piece (good sides together). Pin and sew the two pieces together along the front hood edge. Turn through so the hood lining sits inside the outer hood. Pin along the front hood edge and topstitch. Take one of the blanket pieces and fold in half along the longest edge to find the center. Pin the hood to the blanket and tack into place. Place the second blanket piece on top (good sides together) and sew together. Leave a small opening to turn the blanket out the right way. Turn through and topstitch all along the edge of the blanket. And here we have the finished hood and blanket. That fabric is too soft for words. I didn't have a one year old to model it on so Santa bear is standing in, he's a little smaller than your average one year old but he's close enough. I've added the pattern for the mouse companion. It's made out of the left over lining fabric, a fleece material. I'll probably do a quick tutorial later for it but I'll leave the pattern here for now. Like the other patterns it prints out on an A4 sheet of paper. All ready for a teddy bears picnic.
|
Author - JEBARSBY TUTORIALSHere you will find craft ideas, tutorials and fandom crafting. Maybe some recipes Archive
May 2018
Categories
All
|